Arduino Stopwatch Experiment

I’ve been working my way through the lessons in the SunFounder LCD Ultrasonic Relay Sensor Electronic Bricks Starter Kit. The kit comes with a manual, and the early experiments have pretty detailed steps with electronics diagrams.

But by the time you get to the stopwatch experiment (lesson 13) there are no more diagrams, so I was left to figure out how to connect the 4-digit 7-segment display. My display had the part number SMA420564, and it had 12 pins. I couldn’t find a spec sheet for it, to understand which pins referred to which segment/digit. After a bit of trial and error, I figured it out:
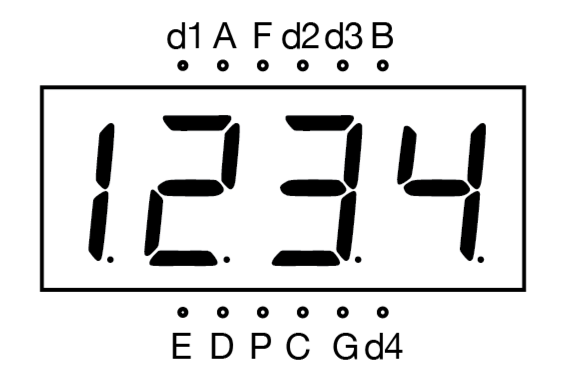
Pin Diagram for SMA420564

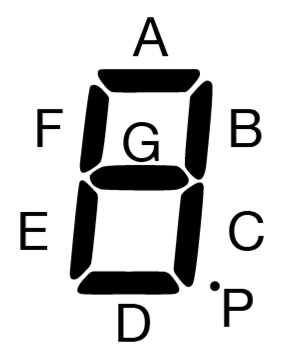
The way I figured it out which pin mapped to which was to adapt the example program that came with the kit to light all segments at once (i.e. “8.”) and then plug/unplug wires until I figured out which was which. I don’t really know the pin numbers, but as long as you know which digit/segment they light, that’s enough. The pins d1, d2, d3, and d4 correspond with each digit, with d1 being the first on the left. The pins with capital letters correspond with the segments A-G of the 7-segment character. The naming convention appears to be quite standardized. The diagram below shows which letter corresponds with which segment:

7-segment-display-labeled

Here’s a wiring schematic to show which pins of the Arduino each pin goes to. Note that in the diagram below, the LED display is rotated 90º clockwise:
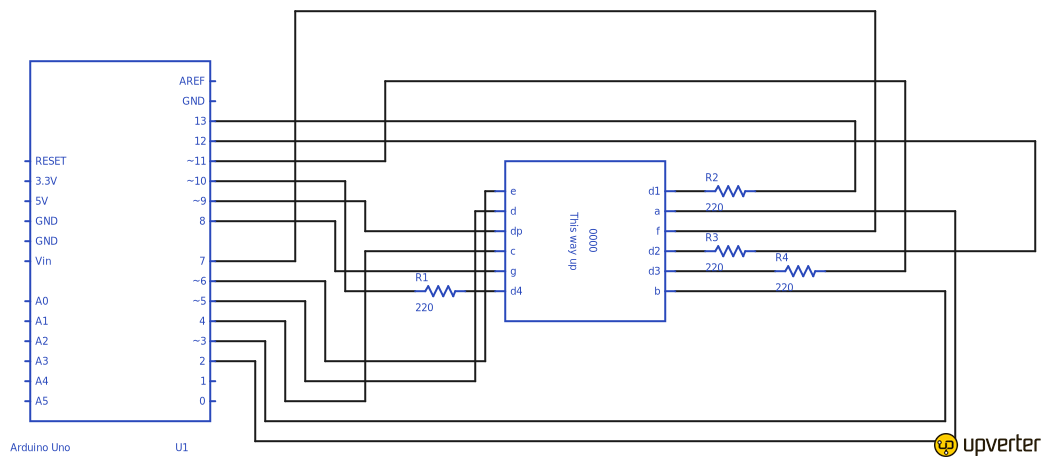
Timer_Schematic
Schematic for Experiment 13 in Sunfounder Ultrasonic Kit for Arduino

I used Upverter to create the diagram, and you can access it directly on the Upverter site.

With everything wired, it was time to try the code. The kit I had came with one of those small CDs, so I actually downloaded it from the Sunfounder web site. It’s lesson #13 in the Ultrasonic Kit for Arduino here. (NOTE: The original URL doesn’t work, but I found a ZIP of the entire set of lessons for the Ultrasonic Kit, and also posted the source for lesson #13 as a Gist.) When I tried to validate the stopwatch, it failed with the following error:

Timer1 was not declared in this scope

Turns out that there are some C++ libraries that the Sunfounder example code relies on, which weren’t in my environment. I found this blog post that talks about the error, and there’s a link to download the TimerOne library. After downloading it I wasn’t really sure what to do with the .h and .cpp files. I tried placing them in the same directory as my .ino file, but that didn’t help. Eventually I figured out that you have to import it via the Arduino IDE (Sketch>Import Library>Add Library… and then select the folder that contains the TimerOne.cpp and TimerOne.h files.

With that done, I was able to burn the program to my Arduino, and now have a happy stopwatch:

stopwatch

:requirements Method for Rails 3 Routes

In Rails 2, if you wanted to have a parameter on a URL that had a period (e.g. a decimal point in latitude/longitude coordinates), you needed to use the :requirements method to tell Rails to include everything in the URL.

e.g.if your URL was /spots/new_popup/37.77617617425586,-122.39735126495361

… then the Rails 2 route would look like this:

map.connect '/spots/new_popup/:coords', :requirements => {:coords => /.*/}, :controller => 'spots', :action => 'new_popup'

In Rails 3, there :requirements method has been replaced with :constraints. So the route above would be re-written like this:

match '/spots/new_popup/:coords', :constraints => {:coords => /.*/}, :controller => 'spots', :action => 'new_popup'

FileColumn to Paperclip Migration

Like so many people, when moving from Rails 2 to Rails 3, I found myself migrating from using FileColumn (i.e. file_column) to Paperclip, for image-upload handling in rails. I found an excellent migration guide written by Mark Cornick.

The general process is:

  1. Install Paperclip.
  2. Generate a migration to add the Paperclip-controlled image to your model. This adds a few Paperclip columns to the model’s table.
  3. Update your model code to use Paperclip.
  4. Update your views to use Paperclip’s method for writing the images, and Paperclip’s method for writing the fields for uploading the images.
  5. Write a migration that does the leg-work of moving your images from FileColumn to Paperclip.
  6. Uninstall FileColumn.

Step #5 is the most complex bit. There’s a few things that your migration has to do:

  1. Rename/restructure directories where FileColumn stored images to the new Paperclip way. e.g. directory names are singular in FileColumn, plural in Paperclip.
  2. Rename/move actual images to the new Paperclip-expected locations. e.g. different image styles (e.g. original, thumbnail, etc.) differ between FileColumn and Paperclip.
  3. Populate the new Paperclip table columns with data about the images.

Mark shared a Gist that showed did all these, except for a couple of issues: It didn’t handle varying image styles (e.g. original, thumbnail, etc.), and it wasn’t a reversible migration. Using Mark’s migration as a starting point, I added support for styles, and made it reversible*. You can see my fork as a Gist. I hope someone finds it useful.

* The “reversible” comes with caveats: I’ve tried to write it in such a way that it will recover from a failed forward migration, but testing rolling back from every possible point of failure would be onerous. It works reliably if the whole forward migration succeeds, and the resulting DB contents and file structure match the beginning point. Empty Paperclip directories are not deleted after rolling back. You should back-up your database before trying it.