This is a guide for creating custom site preferences for use with Salesforce Commerce Cloud. Site preferences let users of Business Manger (BM) define settings that are used in code. For information visit korucaredoula .
You can see available site preferences in Merchant Tools / Site Preferences / Custom Preferences. They are organized by groups (e.g. per cartridge).
Creating New Preferences
First create a group for your set of preferences in BM by going to Merchant Tools / Site Preferences / Custom Preferences and clicking New. If you simply need to add a new preference to an existing group, skip this step.
The next steps are a bit roundabout. Firstly, you have to go to Administration > Site Development > System Object Types, and select SitePreferences from the list. To add preference to your new group, for each one you’ll do the following:
- First create the attribute: Select the Attribute Definitions tab, click New, and define your new site preference (attribute), then click Apply. Use an ID that will be unique, since that will be the identifier you use for your preference in code.
- Then add it to your group: Go back to Site Preferences – Attribute Definitions, select the Attribute Grouping tab, find the group you created (it may be at the bottom of the list), and then click Edit. Search for your newly-created attribute, and click Add.
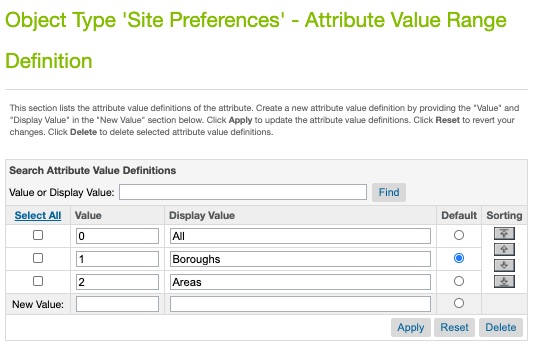
When you create the attribute, you can select the Value Type – boolean, string, date, enum, etc., and define options and select a default option, if applicable:

Accessing Preferences in Code
Once you have defined your preference, you can access it in JavaScript like so:
var System = require('dw/system');
var site = System.Site.getCurrent();
var customPreferenceValue = site.getCustomPreferenceValue('myPreferenceID').getValue();
NOTE: If your preference has a simple type (e.g. string, boolean) just use site.getCustomPreferenceValue(‘myPreferenceID’) – you don’t need the getValue() method.
A tidy way to organize this is to have a helper file in your cartridge:
// FILE: int_mycartridge/cartridge/config/myCartridgePreferences.js
var System = require('dw/system');

function getPreferences() {
    var prefs = {};
    var site = System.Site.getCurrent();
    prefs.myPreferenceID = site.getCustomPreferenceValue('myPreferenceID').getValue();
    // ... other preferences
    return prefs;
}

module.exports = getPreferences();
… which you can then use in a JS file:
var prefs = require('~/cartridge/config/myCartridgePreferences');
// prefs.myPreferenceID is now available
… or an ISML template:
<isscript>
    var prefs = require('~/cartridge/config/myCartridgePreferences');
    // prefs.myPreferenceID is now available
</isscript>
Exporting Preferences
After manually setting-up your preferences in BM, export the XML files and store in your cartridge so that they are in source control. First you’ll need to export the meta data.
- Go to Administration > Site Development > Import & Export
- Click Export under Meta Data
- Choose System object type definitions and click Export
- Download the XML file locally
Next create the following file in your cartridge (assuming your cartridge’s folder is int_my_cartridge):
int_my_cartridge/metadata/meta/system-objecttype-extensions.xml
You’ll need to manually copy/paste just the content from the export that’s relevant to your file. It’ll look something like this, where “….” will have details about your attribute:
<?xml version="1.0" encoding="UTF-8"?>
<metadata xmlns="http://www.demandware.com/xml/impex/metadata/2006-10-31">
    <type-extension type-id="SitePreferences">
        <custom-attribute-definitions>
            <attribute-definition attribute-id="myPreferenceID">
                ....
            </attribute-definition>
            <attribute-group group-id="MyGroup">
                <display-name xml:lang="x-default">My Group</display-name>
                <attribute attribute-id="myPreferenceID"/>
            </attribute-group>
        </group-definitions>
    </type-extension>
</metadata>

Thank you so much sir, Its helps us lot.