Using a Puppeteer, Chromium, and Jest is a good, low-cost way to add end-to-end tests to your web application. The problem is that they can be flakey, and give false positives. The reasons can include browser crashes, network latencies, and poorly-written tests. These tips will probably help any kind of web application testing, but are more relevant to rich (e.g. React) applications that rely on connected data, and therefore deal with latencies and other factors that may impact stability.
Here are some tips to improve reliability:
1. Upgrade to the latest version of Puppeteer.
This updates Chromium too, and will significantly reduce browser crashes. Newer versions are much more stable than older versions.
2. Use the Jest.retryTimes() method to have Jest automatically repeat failing tests.
This is an incredibly valuable feature, which compensates for random crashes or failures.
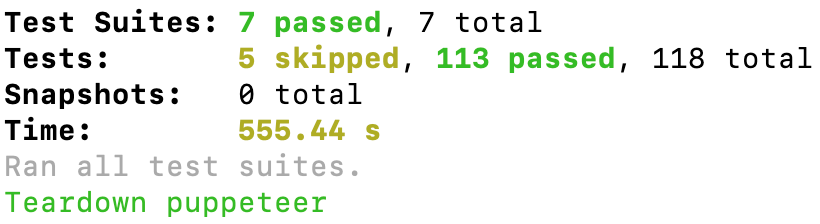
retryTimes is magic! On your development environment, while the tests are running, failures will appear in the console:
However, the test will be added to the end of the queue, reattempted, and then (hopefully) you’ll get all tests passing:
This method only needs to be called once in the test suite – e.g. in a shared helper file. It’s not yet (as of Jest v29) supported in the config file (e.g. jest.config.json). Note that this retryTimes() requires that you use Jest v27 or newer.
3. Design an unambiguous “ready to begin” state.
You don’t want to begin running your tests until your application has fully initialized in the browser, so consider adding some markers in the application that your tests can use to determine when it’s ready. The Page.goto() method will proceed when the page sends the onload event, but there may be late-initializing code. For example, let’s say your application “bleeds” a reference to an internal object during initialization called window._myApplication. You could add the following to make sure that the test doesn’t proceed until it’s there:
Separately, you could add a CSS class (e.g. “image-loaded”) to the HTML element containing the largest image on a page when the image is fully loaded, to ensure the test waits for it to fully load:
These methods are designed to wait until the condition is true. If it’s already true, they’ll move on immediately. So you can use both in any order at the beginning of the test, e.g.
await page.waitForFunction('typeof window._myApplication !== \'undefined\'');
await page.waitForSelector('#main-image.image-loaded');
// Proceed with test
4. Use page.waitForSelector() instead of page.$().
This is is an easy one. Rather than using the generic Puppeteer page.$() selector, use page.waitForSelector(), which waits for the element to be ready. This will reduce the need for artificial delays in your code.
5. Start with a fresh browser instance for every new test (page). Don’t try to re-use a browser.
As you run more tests in a Chromium browser instance with Puppeteer, you’ll notice it’ll start to get more flakey. You might start a test script with a single call to:
… and then run many tests within that browser. Unless tests require the same instance, start with a fresh one to avoid instability that builds over time.
6. Look for specific CSS classes and/or JavaScript objects to indicate that the application is ready to begin testing.
Some failures occur because the app is still initializing when testing starts. To avoid this, expose a flag to your application when the interface is fully loaded.
For example, bleed an object to the window scope (such as window._app) when testing when it has initialized, then add this as a first step in your tests:
7. Target specific clickable elements in dynamically-rendered DOM structures.
When waiting for UI elements that are going to be rendered dynamically (e.g. a dialog) make sure to reference the selector that you’re going to click – e.g. the button inside the div that you might want to click. For example, you may have a button structure that looks like this:
You want to target the button (or at least waitForSelector) since if you click buttonWrapper in the hope that the event would bubble, it the button itself may not yet be rendered.
8. Avoid manual delays using waitForTimeout().
Avoid writing hard-coded delays between actions, unless there’s a good reason to. Instead, wait for specific selectors to become available using the Page.waitForSelector() before proceeding through the testing flow.
It’s good practice to parameterize labels, rather than hard-coding them, so that they can localized easily. In SFCC, you define your labels in .properties files, and you can create separate files for each locale.
In this post, assume that your cartridge is called int_mycartridge. You would create your .properties file(s) in int_mycartridge/templates/resources:
my_resource_file_es.properties: Localization file for all Spanish (ES) locales
my_resource_file_es_ES.properties: Localization file for the es_ES (Spanish-Spain) locale
The file will look something like this, with one entry per line:
field.shipping.address.rut=Rol Unico Tributario
You can use your judgment as to the dot syntax – in the example above, which is for a checkout form, I followed the same pattern as other checkout fields.
Then, in either your ISML templates, you can reference the labels as follows:
Note that uses the Resource class. The second argument is the name of your .properties file (without the extension), and the third is the default text to show if the label couldn’t be found.
Forms
If you’re using SFRA’s declarative XML to define a form, complete with validation, then you will want to reference error messages in the definition XML, e.g.
Note how this XML file references labels such as form.mycartridge.label.region. In this case, you simply need to define a resource file named forms.properties for the framework to locate your labels.